Posts categorized “Computer Repair”.

Computer Repair Tech’s recommended antivirus.

At this time the Antivirus we recommend is Avast. At this time we do not recommend the paid version of the product as the free version provides a really good amount of protection. I always recommend doing a custom installation of Avast and choosing the following options:

avastoptions

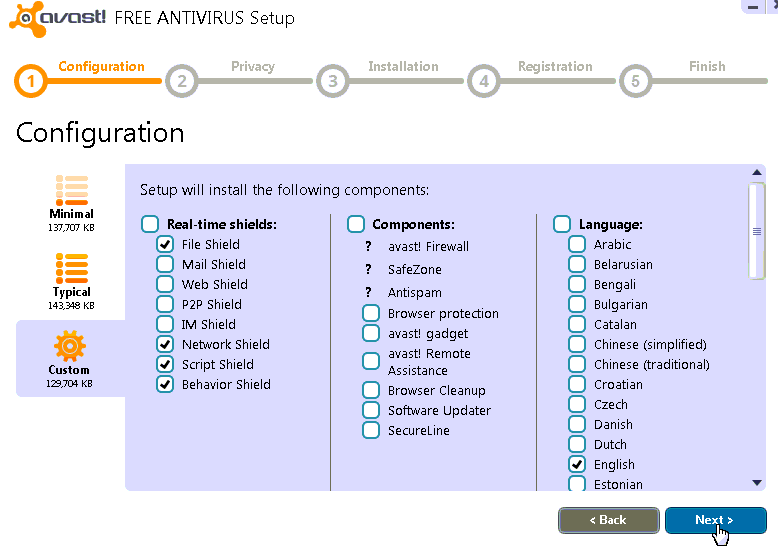
If you have a hard time remembering to accept that adobe flash upgrade or that java update then by all means click the software updater but I find performance wise its better to keep it off. I recommend Avast because its got a really good detection rate, a boot time scanner, an automatic sandbox feature and lets face it every other free antivirus out there right now kind of sucks. We know Microsoft Security Essentials detection rate has dropped down too low to be a viable choice. AVG continues to have problems and struggles to remove some rootkits and the performance is pretty poor. You may be thinking “what about a paid antivirus solution?” at this time I do not believe that any of them are worth the money unless you need to be protected from yourself. If you are wreckless or have children in the home then perhaps a solution like kaspersky or bitdefender may be more appropriate for you. Computer Repair Tech offers a managed antivirus as an option for users that subscribe to the PC Maintenance Plan.

Computer repair technician software

Every now and then a fellow computer technician will visit the site and inquire as to what software I use or recommend. Well my toolkit is pretty massive but the application I usually transfer over first is called D7. D7 is a compilation of many different computer technician tools and the author of the application is constantly working on it. Most common software related computer repair situations can be resolved from D7. The solution may not always be obvious as the interface is far from perfect but rest assured it really is an immensely useful utility.

D7 also makes it very easy to keep popular tools up to date as the application can simply download the newest versions of commonly used computer repair software. Many different computer repair technicians including myself have contributed ideas to implement into D7. I also use dSupport which is another program from Foolish IT LLC the makers of D7. If I had to pick another software tool that I use almost as much as D7 I would probably have to go with AS SSD Benchmark which is NOT an SSD only utility. AS SSD Benchmark quickly lets you know if theres issues with sata drivers, partition alignment, and also lets you quickly test transfer speeds and access time.

Avoid purchasing all in one computers.

Many people have been going out and purchasing laptops or all in one desktop computers. Please do not purchase either of these products unless you have a really good reason to do so. For laptops please make sure you need the portability before making the purchase. I know many people out there that have purchased laptops but they just sit there in the same spot at home all day long.

When you buy a real desktop PC you can usually upgrade it after a few years by replacing parts or even taking out the parts and putting them into a new computer. You can also use the monitor with another computer in the future. When you have an all in one computer you are extremely limited in what you can upgrade. After a few years your all in one computer becomes out dated and you have to buy a completely new computer to catch up with technology.

Computer repair tends to also be much easier when you are working with a desktop. Desktops typically have significantly more room to work in and they do not use as many proprietary parts. If an aspect of the desktop breaks you can just swap it out with a new part. Please remember that not all desktop computers are equal so try to avoid any of those smaller mini towers as they can be significantly more difficult to upgrade.

“This program contained a virus and was deleted” for every file.

If you would like Computer Repair Tech to resolve this issue for you please check out our Services page for pricing on Virus Removal.

So I have been hearing about this problem recently quite a few times. I have been dying to get my hands on this issue that has eluded so many other computer technicians. It looks like a technician that goes by Dannim resolved the issue on the foolishtech.com forums. He made a post yesterday that said:

Hey guys, I believe I’ve found the problem. It appears (on the latest system that I’ve seen this) that all the Windows Defender files have been replaced with shortcuts/symlinks to System32\config. I ended up copying the “Windows Defender” folder from another Vista x86 and pasting it in. Afterwards I was able to turn Windows Defender on and downloads were going through.

One problem though is that the “en-US” folder shortcut (symlinkd) could not be removed. “rmdir” should work, but all I got was “This directory is not empty”. “del” would work, but because of the symlinkd it would delete System32\config files, which might come under the heading of A BAD THING TO DO . I renamed that folder and pasted in the proper “en-US” without issue.

Now as I understand it this issue can be caused by other antivirus products as well such as AVG but if you’ve already cleaned that up and you still can’t resolve it then time to look into the Windows Defender folder like Dannim stated.

Java Installation Failed The wizard was interrupted

Today I am going to address a common issue i’ve seen people having trouble resolving on various computer repair related forums.  Everytime you try to install Java you get a message that says “Java Installation Failed The wizard was interrupted before Java 7 Update ## could be completely installed.  To complete installation at another time, please run setup again.”

When you see this message it’s because some left over traces of a java installation are still in the system.  It may not actually be a java element but could be a windows installer element as well.  So if you already tried a java uninstallation through add/remote programs as well as http://sourceforge.net/projects/javara/ then the next step to take is to check for an issue with the windows installer.

I don’t usually have a lot of success with microsofts fixit for windows installer (honestly what exactly do we even call it these days,  the thingy that replaced windows installer cleanup utility!) but in this particular case I successfully used it to resolve the java installation issue and was able to install java immediately after.  The location of this microsoft fixit can be found at: http://support.microsoft.com/mats/Program_Install_and_Uninstall.

So once you launch the software accept the terms and then click “Detect problems and let me select the fixes to apply” on the next prompt it will ask you “Are you having a problem installing or uninstalling a program?” select Installing.  Later it will prompt you to select which program you are having trouble attempting to install at that point try to find java in the list.  If you can not find java in the list you may want to try cancelling out and selecting the detect problems automatically option.

Redirect virus can be a serious threat

There are many people out there that think that a redirect virus is no big deal but in reality that is rarely the case these days. It’s true there are some redirect viruses that do nothing but simple redirects but that’s not as common as it use to be. Many redirect viruses these days are from rootkits like Zero Access. Instead of just redirecting websites what your computer might actually be doing is also trying to steal your banking and email account related information. The redirect virus may also be doing fraudulent clicks in the background causing small businesses to suffer. In fact it is estimated that the zero access rootkit by itself (that’s not even counting all the other redirect viruses) cost advertisers 900,000 U.S. dollars a DAY.

Please understand that when you sit there and ignore a redirect virus you are helping criminals make money and lots of it. We charge 75.00 for our complete virus removal service and we also throw in free computer optimization and a free antivirus tweaked for performance. Please if you do not get help from us at Redirect Virus Removal please get assistance some where.

New website has launched!

Today Computer Repair Tech has launched the new website. Please look around and tell us what you think.

We would like to give special thanks to Jay from http://revisedagain.com for help with the back end code and converting the layout to wordpress format. Without his services this website wouldn’t have been up for at least another 2 weeks.

NVIDIA Installer Failed

If you are having trouble installing recent nvidia graphics drivers in particular nvidia update then try the following steps:

Press windows+r to open ‘Run program’

type ‘lusrmgr.msc’ to open user controls

Select User folder

Delete Updateususer

Try to re-install again

I can’t take credit for this fix as it was posted by “albinosquirrel” on the nvidia forums.


Lenovo Onekey Recovery Password Reset for Y550 and possibly other models.

This topic is for advanced users.  There is no default password to my knowledge.

The OneKey Recovery Password is kept at 2 different  locations one is the second partition thats visible for example D:\OneKey App\OneKey Recovery\pw.dll and another in the root folder of the hidden partition.   To remove the password you simply delete both pw.dll files.

How do you gain access to the hidden partition?  Well thats a good question!  One method is to attach the Lenovo hard drive to another computer using a usb adapter and use disk part:

Step 1: hook up drive to a windows box, open diskpart from cmd prompt

Step 2:

DISKPART> list disk

Disk ### Status Size Free Dyn Gpt
——– ————- ——- ——- — —
Disk 0 Online 931 GB 86 GB
Disk 1 Online 223 GB 1024 KB
Disk 2 Online 2794 GB 0 B *
Disk 3 Online 931 GB 0 B
Disk 4 Online 298 GB 0 B

(find the lenovo disk)

Step 3:

DISKPART> select disk 4

Disk 4 is now the selected disk.

Step 4:

DISKPART> list partition

Partition ### Type Size Offset
————- —————- ——- ——-
Partition 1 Primary 252 GB 31 KB
Partition 0 Extended 30 GB 252 GB
Partition 3 Logical 30 GB 252 GB
Partition 2 OEM 14 GB 283 GB

(find that hidden partition)

Step 5:

DISKPART> select partition 2

Partition 2 is now the selected partition.

Step 6:

DISKPART> detail partition

Partition 2
Type : 12
Hidden: Yes <-confirm you are looking at the hidden partition
Active: No
Offset in Bytes: 304229646336

There is no volume associated with this partition.

Step 7:

DISKPART> SET ID=07 OVERRIDE

DiskPart successfully set the partition ID.

Step 8:

windows should have detected the partition now and assigned a drive letter at this point…least it does when I have the laptop hard drive connected via usb. Delete the pw.dll in the root directory.

Step 9:

DISKPART> SET ID=12 OVERRIDE

DiskPart successfully set the partition ID.

Step 10: Put hard drive back in to Lenovo laptop and you are done.


Was this post helpful to you? If so we would really appreciate it if you hit the facebook like button below.

Windows 7 Start Menu Missing Newly Installed Shortcuts?

I just found out today that Windows 7 has some sort of soft cap of 70 items on the Windows Start Menu.   I don’t exactly understand how it works yet but when certain installers install applications in C:\ProgramData\Microsoft\Windows\Start Menu\Programs the newly installed shortcuts will only instantly show up if you had less than 70 items in that folder prior to installing the new app.  However if you restart explorer these new shortcuts will display.